🏎️ Get ready to race in style!
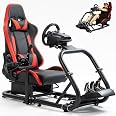
The Marada Racing Sim Cockpit Stand is a professional-grade simulator designed for serious gamers. With its sturdy construction, ergonomic seating, and extensive compatibility with popular racing wheels, it offers an immersive racing experience. The adjustable features ensure that every user can find their perfect setup, making it a must-have for any racing enthusiast.
| Additional Features | Upgraded professional version Wide Compatibility Unique Industrial Style Design |
| Power Source | NO |
| Hardware Platform | PlayStation 5, PC/Mac |
| Controller Type | Steering Wheel |
| Connectivity Technology | Manual |
| Compatible Devices | Playstation 4 |
| Item Dimensions | 23.6 x 23.6 x 7.5 inches |
| Item Dimensions D x W x H | 24"D x 24"W x 8"H |
| Package Quantity | 1 |
| Color | MR-cockpit54+redseat |
E**S
Great Sim set-up
Didn't want to invest a ton of $$$ testing out whether or not I'd like to sim race but it turned out to be a really good deal! Stout built sim rig. Thick tubing with endless adjustments once built, adjustable seat is comfy for hours of game play. EXTREMELY happy with this set-up. I did modify a few things for my own personal wants but for a cheap basic sim rig, it's tough to beat! I added 2" locking castor wheels (AMZ# B0CKRF9G5S)to move it away when I wasn't using it. I also added a small shelf bracket (AMZ# B07QLK6PWS)to stiffen up the shifter plate. I modified and installed these seat brackets (AMZ# B09KFH5164 ) to get a better seat angle. I also ran all the wiring internally and mounted this USB hub (AMZ# B0CD1BHXPZ) to the motor plate for ease of wiring and adding additional toys when needed. I am using the Logitech Pro racing wheel, pro pedals and pro sequential shifter/hand brake. Added a Moza 7 speed shifter to balance out the rig.
A**.
Great product
This thing is awesome! My kid loves it and it really sturdy. Putting it together wasn't too bad.
E**S
Great sim rig for the price
I purchased this rig to replace a similarly priced folding rig that wasn't really working for me. After quite a bit of research I settled on this cockpit because of its solid 2" tubular steel design. I was looking for something that was solid and wouldn't flex but didn't want to shell out the money for an aluminum profile setup. This fits the bill.The cockpit arrived in 2 boxes, one for the metal rig and one for the seat. Shipping was about a week faster than quoted at purchase. Shortly after I placed the order, it shipped and I received an email from Supllueer letting me know that my order was shipping in 2 boxes from 2 different warehouses. They included FedEx tracking for both shipments as well as additional assembly information and instructions. I found this to be very helpful.Assembly was straight forward. Besides the included instructions there a number of videos available that show how this gets put together. In assembling the metal frame I had only one minor issue with the base being slight askew so that the top curved section didn't quite match up. I solved this by giving it a couple of gentle whacks with a rubber mallet to get everything lined up. To assemble the seat I first attached the bottom section to the mounts and then secured the mounts to the base. Then I attached the back to the seat. This made it easier to work with. There is one plastic cover piece that covers the seat bracket that I couldn't get attached because it looks like the predrilled hole if off slightly.The seat itself slides forward and back easily and the back adjusts with the lever on the right side. The seat includes adjustable lumbar and head supports. Its reasonably comfortable but I would've liked more padding on the seat.In use the rig is very stable with no flex in the wheel mount or the brake plate. It has a relatively small footprint, less than 60" long so it doesn't take up much space. Overall I would recommend it to anyone looking for a starter rig that's under $300.
W**E
Top Notch!!
This racing rig is top notch quality!! During the unpacking, I noticed that the tubes are laser welded and look excellent! The bolts and nuts were all thread chased and this made assembly a breeze as every single bolt was threaded in with my fingers with ease. I say this because after paint and powder coat it tends to make threads tight, but this is not the case with this. The instructions are clear, mostly graphical, but make sure you follow them as to which side the washers go on.An assembly tip....only finger tighten all the mainframe tube flanges together until all of the mainframe is together. It will line up easier.The seat looks awesome!! Comfy too!Once assembled, this rig has a huge amount of adjustability to it! Being a welder/fabricator, I am truly impressed with this product!!
P**.
Worth the money.
The quality is very good. It is sturdy after assembly the seat slides back and forth smoothly. I would definitely recommend this to a friend. The only thing I recommend is in the assembly, mount the seat to the base then put the seat and base on the tubular frame. The instructions tell you to put the seat base on the frame then mount the seat to the base. I believe that would be virtually impossible.In my opinion you will not find anything better for this price.
M**N
Missing the frame
We only received the seat. The frame was not included in the box. This is a Xmas gift. Now what do we do?
J**N
Great build, quality welds, rigid, so comfortable 5⭐️
Woah! This thing is fantastic!!!! Directions are terrible in regards to how to start out and obviously the seat department and frame department dont talk to each other but once you get it together it is fantastic!!!Rigid frame, adjustable seat great, comfort great, love the back and head rest additions to the seat.-SO…no one in their right mind would put this together the same as they did the first time following the directions.If your going to put it together connect FIRST the front curved piece to the frame that connects to the seat. Then assemble front there.-Also, if you have a multi tool cut the supplied hex wrench as short as possible when you’re about to connect the frame and the seat. (There’s directions for the frame, there’s directions for the seat but not connecting directions. Its kinda obvious but a PITA).-I used a #9 hex bit and 1/4” wrench to hold the bolt and tighten the nut below. The design team needed to make the vertical seat connection pieces longer and the seat adjustment frames holes farther down so theres better access to the holes. It is a biz to get to the way it is.Also if you have an impact drill, 1/4” socket adapter, socket, #9 hex bit with 1/4” extensions and a ratchet wrench it helps out. The supplied stuff is garbo
B**N
Great Buy
Very sturdy. But the back of the chair is a bit loose to where it connects to the bottom. Still works well
Trustpilot
1 day ago
4 days ago