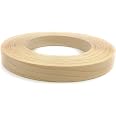
🛠️ Elevate your DIY game with flawless, flexible maple edge banding!
Edge Supply's Maple 3/4" x 50' Roll of pre-glued plywood edge banding offers premium A-grade real wood veneer with a finely sanded finish. Featuring German hot melt adhesive for easy iron-on application, this flexible veneer is compatible with multiple surfaces and customizable through trimming, sanding, staining, or painting—perfect for cabinetry, furniture restoration, and creative projects.
| Item Thickness | 0.75 Inches |
| Item Form | Roll |
| UPC | 736283520637 |
| Number of Items | 1 |
| Grade Rating | A |
| Manufacturer | Edge Supply |
| Part Number | 712048503275 |
| Item Weight | 5.3 ounces |
| Package Dimensions | 10.87 x 6.54 x 0.75 inches |
| Item model number | CECOMINOD039810 |
| Is Discontinued By Manufacturer | No |
| Size | 3/4 inch X 50 ft |
| Finish | Unfinished |
| Item Package Quantity | 1 |
| Cutting Diameter | 0.75 Inches |
| Batteries Included? | No |
| Batteries Required? | No |
A**R
Short time to complete this job.
We were pleasantly surprised with how easy the application was to an old school folding table for a sewing machine that we bought at a resale shop to benefit dogs. We bought paper covering from Amazon for the top and then covered the edge surrounding with this German product which was coated with glue. Heated my iron and in a few minutes the edge looked great.
L**M
Easy to apply.
Used this to cover the edge of maple plywood for cabinet shelves. Easy to apply and stain.
D**G
Better than the competition
I built a buttload of cabinets with full-overlay doors, the second half of a big basement remodel I began a couple of years ago. Previously, I bought pre-glued edge banding form Rockler, which I applied to the exposed plywood edges using a household iron. It worked ok. It seemed secure enough, but after several months it began to separate in places. It's easy enough to re-heat it to re-bond it, but once you apply the finish, that's a no-go. You can secure it with wood glue, but it competes for space with the rubbery hot-melt glue, so it's difficult to get a clean glue line, so you kinda have to live with it.This stuff from Edge Supply is vastly better. First of all, the 3/4" width is as advertised, which leaves exactly 1/64" on either side of standard maple plywood, which I quickly knocked off with 150 grit using a random orbit sander.Second, it sticks and stays stuck. I though it was because I used a heat gun this time, but the leftover Rockler stuff, which I intended to use up, didn't work any better than it did with an iron, so I pitched it.Third, the glue line is virtually invisible (see first photo), compared to the other stuff, which kept coming unstuck (note the gap in the second photo). Worth mentioning is the plywood edge is straight off the table saw with no special prep.Bottom line: it works like it's supposed to.
H**M
Easy to apply with iron.
Making us an entertainment center and the edges needed little attention to detail to cover up the plywood layers that's "unsightly".Set your iron on "cotton" setting and it goes on easily.You do need to trim the edge a little, 3/4" plywood isn't really 3/4" thick...
N**L
Nice banding
Consistent along the length and easy to apply. Joints are fairly subtle.
K**P
I use this constantly in my DIY wood working project. Great Stuff.
Once you get the hang of it, the backing comes off easily every time. The only material that sometimes gets pulled up a bit is MDF. Be careful with that. Otherwise, it works super good for plywood, softwood and hardwood.
S**Y
Looks great, relatively easy to install
I am building a set of drawers with 1/2" maple veneer plywood and used this edge banding in 3/4" to finish the top edges. I am thrilled with the results.Here is my installation process. I cut the banding a little long then I pressed it down with a travel iron (~$20 here on Amazon) set at about 2/3 its maximum temperature. It worked perfectly to activate the adhesive. Use a wood block to press down the edge banding while it is still hot. A minute or two later, longer is probably better, I used a putty knife to remove most of the excess on the sides. I have seen a lot of discussions online about using utility knives, chisels, files, and card scrapers to remove the excess, but this method worked very well for me. It takes a bit of practice (use a trial board or two first), but with the board on edge held in a vise hold the knife almost vertical, work it gently into the excess a half inch or so down the board, then still holding it almost vertical and at about a 10 degree angle away from the face of the board, run it down the edge to remove the excess. Come back the other way to remove the rest. The putty knife does not have to be that sharp, in fact it is better not too sharp to avoid damaging the board. After the excess is off the sides, sand off the remainder rounding over the top a bit. Only after removing the excess from the sides, fold the excess tabs at the ends down, tear the tabs off downward, and sand off the excess with downward strokes only to avoid pulling the banding off the board.
B**7
Looks nice and has plenty of glue
I used this to band maple plywood edges. Worked as expected and trimmed very nicely. Had uniformed color and grain.
Trustpilot
3 days ago
4 days ago